How To Replace Dryer Belt

If your question is: How To Replace Kenmore Dryer Drum Belt? then you came to the right place. Your mental and brain health will be improving little by little if you are going to be trying to do some of the basic things yourself instead of calling some professional company and paying them extremely lots of money that we as regular working people don't usually have. These How-To instructions are going to be for an Electric Kenmore Dryer with model Number 110.62622101, but usually many dryers are very similar to each other. This Dryer Drive Belt or Dryer Drum Belt has the original part number 80660665, or you can use the new part number for this belt 341241. Do not buy the used belt, make sure it is new. It is much easier and faster and cheaper to get it locally from some local business that sells appliance parts and belts, but if you have lots of time to spare and extra money to throw away then go ahead and call Sears Parts Department 1-800-252-1698. If you live in Spokane city and Washington state then we recommend for you to use the local appliance store that we used called Reliable Parts and it is located at E. 204 Augusta St. Spokane, WA 99207 it is close by Division and Mission intersection. If you will be using these instructions then it will be at your own risk, please be careful and use common sense. So, lets begin replacing the dryer belt:
- Turn off and disconnect the electrical power from the dryer.
- Disconnect the large, long, soft, and aluminum Exhaust pipe from the back of the machine.
.
.
.
.
- Pull out the Lint Screen.
.
.
.
.
- Unscrew the two little screws that you see after you pulled out the lint screen.
- Open up the top by just pulling it up from the front side, but if it is stuck then use a flat screw driver to help it pop up.
- Lay the Dryer on its back with the top lid open.
.
.
.
- Unscrew the top two little screws from behind of the front cover, after you have opened the top lid.
.
.
.
.
.
- Disconnect or just unscrew the whole Door Switch Assembly from the front cover, so it will not be attached to the front cover.
- Slide up the front cover to remove it and put it aside.
- Find and throw away the old belt.
.
.
.
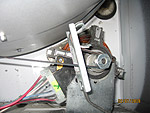
- Find and put in place the idler assembly. On some dryers it has a wheel on it but on this dryer it did not have a wheel on it. Make sure that you set it in place the way it was.
.
.
.
.
- Put on the new belt. Here is how: Find the old marks from the old belt, it should be somewhere in the middle of the drum. Put the belt around the drum first with the V groves facing and touching the drum, then pull the belt through the loop hole of the idler assembly, and finally stretch the idler assembly by pulling the belt all the way toward and around the pulley on the motor. Now here is how the belt should be set, it goes around the drum with groves on the inside, then it goes through the idler loop hole and touching that idlers round spot with its back, then the belt goes around the motor pulley that has the matching groves.
- Rotate the drum manually and make sure that the belt and the motor and the drum all rotate together. Also, make sure the belt is in the right place on the drum, move it in place if you need to.
- Put the front cover back on. Make sure that you align it evenly to get the bottom part of the front cover into the clips first, and make sure the drum is in the right place with the front cover.
- Put the screws of the front cover back in place.
- Connect or reAttach the door switch.
- Raise the dryer on its bottom.
- Close the Top lid all the way.
- Put the screws of the lint screen back in place.
- Slide in the Lint screen back in place.
- Put the large, long, soft, and aluminum Exhaust pipe back in place on the back of the dryer.
- Put your dryer back where it belongs.
- Connect the electrical power to the machine.
- Turn on the machine for a minute or two to test and to blow out any dust that got in.
- That is it, good job, now you have proven to yourself that you can do some basic stuff around your home by yourself, and you saved who knows how much money, and you improved your knowledge, skills, mental health and brain health too.
Also, if you need more help with Repairing pretty much any dryers, then you should buy this Online Video to expand your knowledge, it is called Dryer Repair Video for Whirlpool, Kenmore, Sears, Roper, Kitchen Aid Brands


No comments:
Post a Comment